ppInk
Introduction
ppInk is a user-friendly on-screen annotation software for Windows, compatible with Mouse use, touchscreen or drawing tablet(also with pressure).

Derived form gInk It offers numerous new features freely inspired frm other application such as Epic Pen, making it even easier to use and even more functionalities. ppInk/gInk is designed with simplicity in mind, ensuring it doesn’t distract presenters or audiences during presentations. Instead of adjusting individual settings like color, transparency, and tip width, stroke, ppInk allows you to select different pens for drawing, each with configurable attributes.
because of that ppInk can be used to annotate and then capture the screens, but it can also be used to support demonstration:
https://user-images.githubusercontent.com/4083478/119278023-16f58b00-bc23-11eb-95de-9dc16505bf43.mp4
(extract from @NOVAinc on Twitch)</BR> other demo : https://www.twitch.tv/novaaoe/clip/PlacidConcernedBulgogiOptimizePrime-mONUtlMLGvu2uUu1
This tool is intended to be usable through mouse,tablet pen(taking into pressure) but also throug touchscreen or graphic tablet, and keyboard can be used to activate functions.
It provides a variety of drawing tools, including hand writing, lines (2 points and polyline), rectangles, ellipses, arrows, numbering tags, left/right aligned text, cliparts, stroke patterns, and move/copy/resize/rotate functions.
To streamline the interface, some buttons have multiple functions that can be accessed through multiple clicks or long clicks (or right clicks).
Pens
- Short click : select Pen
- Long Click / Right click : Open the pen parameters dialog
The pen setup (fading / width / line strokes) applies to the following tools:
Hand
 if you press ctrl or shift, you will engage momentarily line tool.
Rectangle
 when drawing, if you use right-click, the drawing will be centered on the click down.
Ellipsis
 when drawing, if you use right-click, the drawing will be centered on the click down.
for these three drawing tools, clicks scroll through the following filling options:</BR> no filling → colored (filled) area → outer filling (interior remains empty) → white filling → black filling
<IMG src=”https://github.com/pubpub-zz/ppInk/assets/4083478/0717a5ba-c7f5-4a0f-b82b-6efd236673ec” width=25%> <IMG src=”https://github.com/pubpub-zz/ppInk/assets/4083478/24114fd3-1276-45ca-b4cf-a4cf6795ce6c” width=25%> <IMG src=”https://github.com/pubpub-zz/ppInk/assets/4083478/ccaf3052-e027-4506-850f-8e1236b3901e” width=25%>
Line

- any click scroll through the following options:
segment line → polyline → color filled polygon → outer filed polygon → white filled polygon → black filled polygon
scaled measurement
when measurement is activated, the length of your in progress drawing is displayed. taking into account the current scale. You can set the scale in the options, but you can also define it drawing. to do so:
- draw a curve, a line, or an arrow with the right button.
- when the drawing will be completed, enter the actual length of your drawing to defin the scale
- draw all your next drawing normally with the left scale. The next drawings length will take into account the new scale
Numbering
- successive Left click select the number tag stamp within the following options:
transparent background → modify tag Number → white background → black background
- Right/Long click opens the dialog box to set the font/style used.
Arrow
- Left click on the button scrolls through the different arrow Tail/Heads:
- Right/Long click on the tool button opens the dialog box to select or modify the arrow heads
As an alternative to Right/long click, the list of arrow heads can be modified through to the options/general settings both opens the following dialog box:
Arrow heads are 300x201 px images and designed for an 18px wide line. During drawing The images are resized to match the current pen size.
The arrow head images reference point are aligned to the drawn segment ends. This reference shall be defined on the center line of image(line 101) and shall be marked by a blue pixel (R=0, G=0, B=255). If this blue point does not exist, the center of the image is used.
By default, arrow heads are rotated to align with the line, but, if the arrow filenames starts with an exclamation mark (!), the drawing remains horizontal. eg.:
<IMG src=”https://github.com/pubpub-zz/ppInk/assets/4083478/ebf5865b-facb-4773-a4c3-05e77f5778de” width=33%>
When drawing an arrow on screen, in standard:
- left click/drag draws the arrow from the tail to the head
- right click/drag draws the arrow from the head to the tail.
this default behavior can be revert:
- using the right button in the sub-toolbar (if activated)
- through the setting in the global setting:
as an alternative, you can select the arrow direction in the sub-toolbar
note: the arrow head can only selected by clicking on the button of the main toolbar
Text
Successive clicks select the alignment:
left-aligned → right-aligned
Once you will have selected the insert point a dialog box will allow you to type in the text and select properties:
While typing in the text, ‘enter’ will jump to a new line, ctrl+enter terminates the input
Lasso
Any click activates the selection of multiple strokes/drawings. Once the tool select, left click adds elements to the selection, while right click removes them. You can either :
- circle strokes with the lasso (red/pink means add/remove) or
- click on strokes (highlighted by a dash box where hovered).
Reselecting the tool will clear the selection.
Whe you modify the selection, you can use the undo button to cancel the latest modification.
When the measure option is activated (eabled in the Options):
the individual length of the hovered drawing and the total length(if applicalbe) is reported in a tooltip.
if the drawing is a 2 segment polyline, the angle is also displayed
Once you have selected some drawing, you can use * Erase tool : will delete selected objects * move or copy tool : will move/copy the selected objects * edit tool : will modify color/line style/width of the selected strokes
Move
<IMG src=”https://github.com/pubpub-zz/ppInk/assets/4083478/e454b112-71e6-4a93-b26c-4ea87cc8c944” width=15%>
Any click Scroll through the different tools: Move one or preselected drawing → Copy one or preselected drawing → Pan all drawings.
Edit
- Left click : modify text/number tool (text and font / frame)
edit drawings’ properties (color, pen width and types, or filling type)
- Right/Long click : edit the text default font(for the duration of the session only, go the Options for a sustainable modification)
You can apply the same parameters to a group of drawings, selecting them before clicking on the button.
Resize / Rotate
Any click Scroll let you choose between the different tranformations: resize → rotate the selected stroke(s) (also applies to stroke under the cursor if no selection has been done first).
Once select, to activate the transformation:
- the cursor displays a target shape (
) select the center of the transformation. It can be :
- a point which will be the center of the rotation or of the resize
- a drawing (highlighted with a red box) to use the ‘center’ of the stroke/shape
- the cursor becomes a red big arrow(
) click and drag to perform the scaling /rotation of the preselected (else the hovered) strokes or text.the selected (if applicable) the tranformation can be done many times
Demonstration of different tools:
https://user-images.githubusercontent.com/4083478/130367372-233d6d64-06fc-4f0f-a976-d66a621f36ac.mp4
- Pointer
- Left click : engage Pointer Mode
- Right/Long click : start Window mode (Dragging the window box) or Fullscreen (with a short click)
Pointer mode
This mode can be engaged: - clicking on the pointer button, - using the global hotkey - or switching between applications with alt+tab.
When activated,
- the drawings remains displayed
- the toolbar is folded
- mouse clicks and scrolls are processed by the windows below.
to return to drawing mode: - unfold the toolbar, - press the global hotkey - switch back with alt+tab
Window mode
Window mode allows to run ppink in a window. when mouse is not hovering the window, scrollings are processed by application behind. If you click in the other application, Pointer mode is then activated. Resuming is performed in the same way as described in pointer mode above.
If you disable “Engage Pointer Mode and Auto-Fold with Alt+Tab”, entering pointer mode/drawing mode will be done at first click. Example of window mode:
https://user-images.githubusercontent.com/4083478/112311221-c656c580-8ca5-11eb-895b-2279366c0fc4.mp4
note : the border color can be changed directly in config.ini
Magnetic

Any clicks toggle the magnetic effect. The magnetic effect allows you:
- to find the nearest point on a drawing (forced holding down Ctrl key):
- on any curve/stroke or ellipse
- vertexes of line/polyline/polygones/arrows.
- vertexes of middle of sides for rectangles or text bounding boxes
- follow line directions (forced holding down Shift key):
- the direction every x ° from the horizontal. x and the distance of the magnetic effect can be adjusted in the global settings in the option dialog box:
Hotkeys are availables for all tools,pens (configurable throught right click on icon next to clock)
Zoom
. 


Any click on this button will scroll through the different zooms and spotlight: Dynamic Zoom → Frozen Enlargement → Spotlight
Dynamic magnifier
this zoom that follows the cursor which Two zoom can be activated (multiple clicks on the zoom buttom). the first one offers a live zoom window following the cursor. The window size can be adjusted using Ctrl + mouse wheel.
__
__
The default size and zoom factors can be modified in the global setting:
Frozen enlargement
this zoom will :
- freeze all drawing in progress
- you can snapshot an area (the area size ratio are bounded to the screen size)
- the area will be displayed full screen
- you can draw on this new image
- once finished, a new click on the zoom button will delete all drawings and background and then restore previous work.
Spot Mode
Spot mode is not actually a zoom. when activated, the screen is grayed but around the cursor to focus attention on the cursor:
 you can activate this spot pressing alt (the cursor will then be also replaced with a big arrow).
is activated, the spot mode remains active in pointer mode (allowing to highlight the active cursor)
you can activate this spot pressing alt (the cursor will then be also replaced with a big arrow).
is activated, the spot mode remains active in pointer mode (allowing to highlight the active cursor)
color, transparency, spot size, and activation with alt can be adjusted in the options / general tab:
Pen Width/Color Picker
- Short click : select Pen Width
- Long/Right click : engage color picker:

this functions allow to set the current pen color picking up a color on screen; in this mode mousewheel modifies transparency
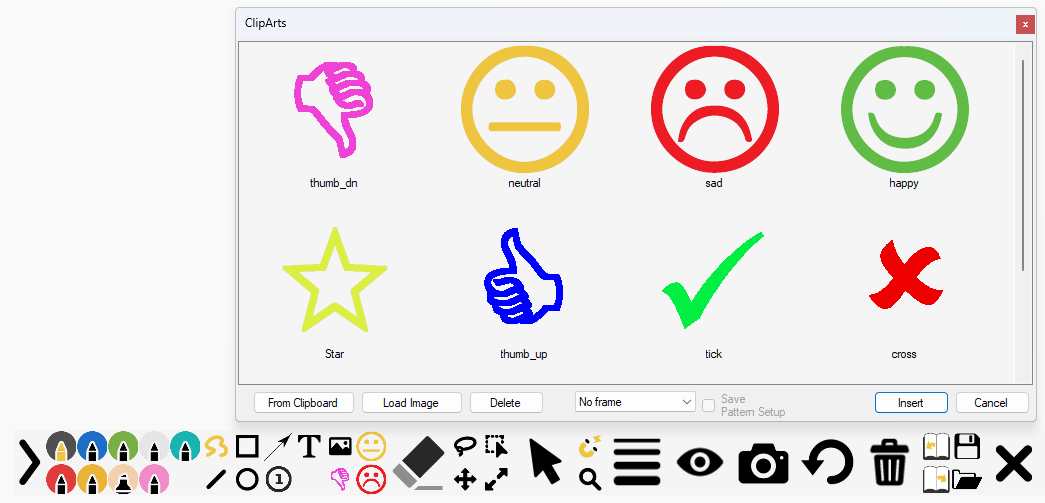
Cliparts
Any click on the clipart button(
![]() ) opens the dialog box to select image and the background/frame:
) opens the dialog box to select image and the background/frame:
In this dialog box, you can :
- Add or Remove images in the list (using ‘From Clipboard’, ‘Load Image’, ‘Delete)
- Select an image to stamp, with its background (the droplist in the bottom)</BR>
When stamping the images:
- with short left click, the image will be stamped with the images original size, and positioned at the top-left position.
- with short right click the image will be centered on the cursor
- with a drag right/left click, the image will be scaled (ignoring aspect ratio) to fit the drawn boun ding box.
if you just draw a vertical or horizontal line, the image will be drawn with the drawn width/height respecting proportional size. else you can draw a box which will define the image size (non proportional). If you draw from bottom/right to up/left, the image will be stamped reversed.
The image list permanently through the global settings:
stamping on curve
The option in the filling combo box will allow you to draw images along a curve. Once selected:
- the cursor will become a target
- you will define the size of the image stamp (the bounding box will be displayed)
- you will define the distance between the images (2 images will be displayed for rendering evaluation)
- the cursor will become an arrow
- you will draw the curve along which the images will be drawn.
example of drawing:
https://user-images.githubusercontent.com/4083478/130367766-ee6cbd89-34d1-43ac-9f3e-13184b6a0bca.mp4
note : when defining a preset clipart, the checkbox “save Pattern setup” allows when you modify one of the predefined clipart to bypass the image size and interval in order to go directly to stroke drawing
preset cliparts
3 buttons are available to get quick access to preset buttons.
- left click selects the image and filling to be used
- right/long click opens the dialogbox to modify the options.
It is also possible to modify these buttons in the global settings
Offset images:
The default position with the left click the position is positioned on the top/left corner. In order to move this position, rename the file in order to add @x.y at the end of the base name to define the position of the cursor (see #269)
eg: mick@1.295.png set the finger at the click position (part of ppink delivery)
Animated Cliparts:
APNG and animaged-GIF are supported. By default these drawings are animated without stopping. Duration or loops renaming the images:
- at the end of the filename add in square brackets the time or how many times the animation will be played for:
- ppInkClipart.png -> animated for ever
- ppInkClipart[5.2].png -> animated for 5.2 sec and then animation stops
- ppInkClipart[3.5x].png -> animated for 3 cycles and a half and then animation stops
- if a negative number is used, indicates that the image will then be erased.
- ppInkClipart[-3.1].png -> animated for 3.1 sec and then disappear
- ppInkClipart[-2x].png -> animated for 2 cycles and then disappear
Visibility


this button make the drawing visibles / invisibles.
Snapshot

- left click : Take a snapshot and exit after
- right/long click : Take a snapshot and then return to drawing mode (keeping data); use alt+Hokey to do that with keyboard
_note: the two behaviors can be inverted in the global options:
Clear Board:
- left click : Delete all drawings and apply last selected background
- Right / long click : Delete all drawings and select background surface color (white/black/customed color, configured in the global settings)
note: the board is a drawn rectangle can be deleted using the erasor next to the border of the screen
Undo

Any click undo the actions.
this button make the drawing visibles / invisibles.
page managment
Any click moves to previous or next page
These pages allow to switch between pages of drawings. This feature can be activated in the global settings.
Save / Load
through those two buttons, you will be able to store(in a text format) the current strokes. Load redraw the saved strokes onto the existing drawing.
- Save button : a long click(or first short click) is a sort of “save as” : it open the dialog box and will allow you to select the filename. the following short clicks will overwrite the strokes into the previously named file. note that a backup is done when inking is ended/quit.
Load button : a long click(or first short click) is a sort of “load as” : it open the dialog box and will allow you to select the filename. the following short clicks will load the strokes from the previously named file. at first click the file loaded is the autosave(from latest session).
An automatic save is performed when closing inking mode in autosave.strokes.txt . If you have ended your drawing session by error, you can recall your work depressing load button immediately after opening session.
Other features / tricks
Calling Window
by default ppink displays a floating window</BR>
- left clicking on it starts drawing.
- right click and drag allows to move the window to another position:
This position will be kept you quit ppInk.
To save it open the options and click on the button.</BR>
If due to screen reconfiguration, the window dissapears, unset/set the “Show Floating Window” : the window will come back to coordinates 100,100.
Alt+ shortcut for temporary commands
When this option is activated (default), and alt pressed is pressed and hold, the next tool/pen/mode is selected momentarily : the previous tool/pen is restored when alt is released. This also affects the shortcuts eg : Hand drawing is selected. Press and hold alt Alt and shortly press and release R : rectangle is active, as long as Alt is depressed. Release Alt then Hand is restored. This can be used witgh combinaisons of Pens and Tools, and dashes, fading. eg : press and hold Alt, you can engage Filled Blue rectangle, depressing R twice, and 3 (in any order). Release alt restores previous tool and color Alt also works with dash line selection or fading shortcut. This can be also used with Erasor when pressing down Alt, the cursor is also temporary change to the big arrow to ease finding it on screen.
Option Capture at opening
In the options you can set the option to engage capture when starting drawing.
Pens Options
through the options or long click on a pen button, or using the edit pen hotkey you can edit pen:
- Fading : the stroke drawn will disappear after the defined time(adjustable in options dialogbox/pen tab)
- Line Style (Stroke/Solid/Dash/Dot/DashDot/DashDotDot) : This will apply the define line style on all type of drawings. Stroke keeps the original drawing which uses the pen pressure to adjust the width. Solid,Dash,… ignore pen pressure.

Note1 : When drawing with dashed lines,try to not draw too slowly : the number of vertex will increase and make the drawing not very nice
Note2 : Hotkeys allows to set/unset the fading, linestyle, increase/decrease penwidth and open the pen modify dialog of the current pen
Note3 : an option is now available in options/pen to allow to modify the linestyle when clicking on already selected pen button(or using hotkeys). also an option in hotkeys allow to select which linestyle will be accessible through click/hotkeys (not applicable to Pen Modify dialog box)
Note4: up to 10 pens can be accessible in the toolbar. a second page can be activated in the options:</BR>
To access this second page, press ctrl and/or shift or click on the vertical separation bar on right of the group.
A global option exists also to set/unset smoothing. When off, strokes drawing will not be smoothed. General recommendation is to leave this option on.
mouse wheel
Mouse wheel allows you mainly to modify the pen width. this can be easily observed with the tipped cursor. in this configuration, finding the mouse may be difficult to find in this configuration : you can then depress the alt key to get the arrow(or customized) cursor. When Number tool is selected, instead of change pen with, it changes the number size. shift+mouse wheel allows to select pen note1 : mouse wheel / shift+ mouse wheel can now be swapped (shift+mouse wheel to access pen width) : available in options / pen tab note2 : as said above, two hotkeys are available to control width through the keyboard.
video recording
ppInk has now some capability to do some video recording. tuning is available in options/video tab :
- basic recording with FFmpeg: You need to first install ffmpeg. and select the option in the video tab. In this case the button will be proposed. you can start/stop recording. Names and destination folders are defined throught the command line.
- advanced recording with OBS-studio: You need to first install and configure OBS-studio(https://obsproject.com/fr/download) with OBS-websocket(https://github.com/Palakis/obs-websocket). select the required option (recording or broadcasting). with this program you will be able to start/stop broadcasting or start/pause/resume/stop video recording. file names and folders are defined in OBS-studio. Note : ppink is compatible with release 4.8 of OBS-websocket, but not yet with version 5.0 part of OBS studio 28+. this should be fixed in a next release. for the moment,prefer to stop recording when stopping Ink mode
when ffmpeg recording is selected, you can use ppInk to record your screen and stores events within an M3U file. This could be used during some application testing. During the record you can set some marks manually and automatically when opening the toolbar (for example to highlight the odd observation).
During your analysis, you can replay the M3U file and jump to the different markers.
UI customisation
You add use your own cursors replacing the files. if you use ico file the cursor is down with the file sized ( you can then put a bigger or smaller image)
toolbar Background Color can be changed in the options. currently a draw hickup make the background color incorrect during opening. transparency is currenly ignored
Button Images can be customized putting Png files in the ppink exe folder. the name to be used are the same as the one from the src folder.
When checked in the options, a secondary toolbar will open when selected some tools to access all functions/filling immediately:

The example above shows also an example with the pens on two lines (setup through options dialog box)
Toolbar orientation
You can now select how the toolbar will be deployed : to left/ to right or vertically to top/ to bottom
Engaging Pointer with Alt+Tab
When the option is set in the options, switching application (with alt+tab) will engage pointer mode. Also, Note that you can still fold toolbar when drawing without engaging pointer mode with the dock button.
snapshots in pointer mode
when trying to annote menu opened with mouse click / contextual menus
https://user-images.githubusercontent.com/61389799/111090958-1d3bfc80-853a-11eb-91fc-04e85ed18454.mp4
(demo from @eamayreh)
you can configure shortcuts with shift/ctrl/alt with a press and hold and tap twice keys to prevent menu to close multiple snapshots can be captured, they are pasted one over the other, in the reverse order to make a full sequence
Global options
Many adjustment are possible through the different pages in the options:
All the parameters are saved in config.ini / pens.ini / hotkeys.ini. There is no dedicated files and settings can be stored in any of them.
Over these files, in order to ease upgrades between versions, defaults.ini / pensdef.ini stores some default parameters that are first loaded as default values and should not be changed.
When upgrading from an previous ppInk version :
- copy your previous config.ini/pens.ini/hotkeys.ini into the new folder
- start ppInk
- Open global settings
- save the files : The new entries will be added.
running ppInk
ppInk can be executed from any folder. If the folder has limited rights and can not write in the folder, images and config and translation files will be copied to %APPDATA%\ppInk. This allow ppInk to be run by many users with different setups.
you can also indicate an other folder with your setup in the command line using ppink -c config folder
Rest API
In order to allow customisation, ppInk provides now a REST API allowing control from an external program/device such as a streamdesk from Elgato or touchPortal: Example with StreamDesk :

example with touchportal:
 (thanks to @NOVAinc)
Ensure you are working with http protocol All the API is described in the https://github.com/pubpub-zz/ppInk/blob/master/ppInk/httpRequests.md (in ppInk folder)
Note that this API returns results in JSON format that can be used for further extension.
Download
https://github.com/PubPub-zz/ppInk/releases/
You will find ppInk.zip and ppInkS.zip. this second package provides a ppInk version where network connections have been removed (may ease some security analysis)
Change log
https://github.com/pubpub-zz/ppInk/blob/master/changelog.txt
How to use
Start ppInk.exe and an icon will appear in the system tray and possible a floating window(*)
(which can be moved using RightClick) to start drawing on screen.
Inking is started :
- clicking on floating icon
- clicking on the icon in the system tray
- using the global shortcut (ctr+alt+G by default)
- immediately after start Pping if “–startInking” (case insensitive) has been added tocommand line
- ppInk is run once more (no extra instance is started)
(*) activation and position saving are available in options.
Click the exit button or press ESC to exit drawing.
Tips
There is a known issue for multiple displays of unmatched DPI settings (100%, 125%, 150%, etc.). If you use ppInk on a computer with multiple displays of unmatched DPI settings, or you encounter problems such as incorrect snapshot position, unable to drag toolbar to locations etc., please do the following as a workaround (in Windows 10 version 1903 as an example): right-click ppInk.exe, Properties, Compatibility, Change high DPI settings, Enable override high DPI scaling behavior scaling performed by: Application.
- There is a very few hidden options you can tweak in config.ini that are not shown in the options window.
Configurations
- ppInk can be largely configured. Some examples/proposals of simplified configuation are offered here:
- Simplified configuration from @earthjasonlin

note about ini files: when upgrading to a newer version, you can copy your config.ini / pens.ini / hotkeys.ini. All the new entries will be copied from the defaults part of the delivery,
you can then change the new parameters and when you will use the save to files in the options dialog box, they will be appended to your files
translations
ppInk supports multiple languages, you can contribute to translations. A few points will help you to contribute:
- all translations are in lang folder in your configuration directory.
- en-us.txt is loaded before any other translation : if a translation is missing in your file the english version will be used.
- translation files are loaded at start-up and when you change the langage in the options
- you can build your own translation:
- if it not exist duplicate of the file “en-us.txt” in “ppink/lang” folder with your language entry and then translate the strings in the file.
- to update an existing file:
- open the global options.
- Select first english translation
- Select your file langage. a pop-up will appear</BR>
- confirm to update it. the new entries will be appened at the end of your file
- edit the new entries (you can also reorder the entries as you wish)
- change back and forth the language in the ppInk’s options to reload and test your modifications.
do not hesitate to share your work in https://github.com/pubpub-zz/ppInk/issues/17 to propose your translation. It will be apreciated 😋.
gInk
https://github.com/geovens/gInk
https://github.com/geovens/gInk
© Weizhi Nai © 2019
ppInk https://github.com/pubpub-zz/ppInk © Pubpub-ZZ 2020-2024